Flash a dot card for How Many Do You See?
Use a Quick Look to flash a dice-face 5 for two seconds, let young learners tap how many they saw, and then show them how to see it, with a second card that shows 7 as a red part and a yellow part.
- Level
- Beginner
- Time
- About 10 min
- Steps
- 9
- Updated
- Oct 16, 2026
A two-scene "How many do you see?" lesson where students glimpse a dot card, tap the number they saw, and watch rings show "4 and 1 make 5" and "4 and 3 make 7".
Get the finished lesson
Skip straight to the result, or keep it open beside the steps. Add this tutorial's lesson to your account and explore how it works in the studio.
Free to sign up, and you'll come straight back here. I have an account
How Many Do You See? is a short number-sense routine for kindergarten and first grade. A card of dots appears for a moment and then is covered, and children say how many they saw. Two seconds is too short to count the dots one by one, so children learn to see the group: five like a dice face, seven as four and three more. Afterwards, the card comes back with a ring around each part, so they see the smaller numbers inside it.
A Quick Look runs the whole routine for you: the "Ready, set, look!" countdown, the timed look, the cover, one more look if a child needs it, the number buttons, and the rings.
In this tutorial you'll build a two-scene lesson called How many do you see?:
- A dice-face 5 flashes for two seconds. Students tap how many they saw, and the card comes back showing "4 and 1 make 5".
- Seven dots flash as 4 red and 3 yellow, and the rings show "4 and 3 make 7".
Step 1: Set the scene
Start a blank lesson (New lesson, then Start from scratch) and name it How many do you see? by clicking Untitled lesson at the top left.
Give the scene a warm background. Click an empty spot on the scene, open Background, click Choose a style, and pick Mesh sunrise. Give the Closing Scene the same background so the ending matches.
Then add what students read first:
- A Heading at the top:
How many dots do you see?. Set its Font Size to40. - A Body under it:
Tap Look. The dots hide fast, so look for a shape you know.Set it to Fixed width, about760wide, then set its Font Size to22.

The instruction tells children what's coming. A card that vanishes without warning feels like a trick; a card they're ready for feels like a game.
Step 2: Add a Quick Look
Search the Widgets tab for Quick Look and click it. A dot card with five number buttons under it lands on the scene.
Make it fit under the instruction: in Style & Layout, click Show more options and set Width to 460 and Height to 380. Drag it to the middle of the scene, under the instruction.

The canvas always shows the card face up, so you can see what students will glimpse. The line at the top of the card sums up the settings: Quick look · 2 s · 1 look again · then 2 and 1.
Keep the widget at least 400 wide. Below that, the number buttons get too small for a young child's finger, and the Configure window warns you.
Step 3: Choose the card
Select the Quick Look and click the floating ⚙ Configure button. The settings are in the order you plan the routine, starting with The card.
- Leave Arrangement on Dice face (1–6). Dice patterns are the ones children already know, so they're the best place to start.
- Set How many dots to
5. This is also the right answer.

Berdee draws the card for you, so a dice-face 5 always looks the same and always has exactly five dots. The five number buttons always include the answer, and it isn't always the middle one.
Step 4: Decide how children see it and answer
Scroll down the same window.
- Under How children see it, keep Quick look and set Show the card for to 2 seconds (recommended). Keep Allow one more look on: after the card is covered, a child can tap Look again once.
- Under How children answer, keep Tap a number. This is what makes the card graded.
- Under After the answer, keep Show how to see it on After a right answer, and set Ring these parts to 4 and 1.

The choices in Ring these parts come from the card. A dice-face 5 can be seen as 4 and 1 (the corners and the middle) or as 2, 1 and 2 (two pairs and the middle). Pick the one you want children to talk about.
Step 5: Try it as a student
Click Try it as a student, just under Ring these parts. The real student card plays inside the window. Press Look, watch the countdown and the card, then tap 5:

The rings appear one at a time, then the line 4 and 1 make 5. Berdee also says the countdown and the parts out loud with the device's voice. You can turn that off under More options.
Click Save.
Step 6: Give students time to see the rings
When the answer is right, the scene moves on by itself: the line above the canvas says Automatically flows to Closing Scene (it will point at the second scene once you add it). By default it waits only 0.6 seconds, which is too quick to see the rings.
Click an empty spot on the scene. In Progression, click Show more options and set Advance delay to 3000 ms.

The Scenes panel's thumbnail shows the card the way students first meet it: face down, with a Look button.
Step 7: Make a two-color card on a second scene
The second card shows 7 as two parts, so children start to see that 7 is 4 and 3 more.
- In the Scenes panel, click Add scene. Double-click the new scene's name and rename it
Two colors. Give it the Mesh sunrise background, and set its Advance delay to3000ms too. - Open the Opening Scene, drag a box around all three widgets from an empty corner of the scene, click Copy to Scene in the toolbar, and choose Two colors.
- Open Two colors. Select the heading and change its Text to
How many dots in all?. Change the instruction toLook for the red part and the yellow part. - Select the Quick Look and click ⚙ Configure. Set Arrangement to Two colors (2–10), How many dots to
7, and Red dots to4.

The yellow dots are drawn as rings with a dark edge, so the two parts look different even to a child who can't tell red from yellow. After a right answer, its rings go around the red part and the yellow part.
Click Save.
Step 8: Add an "I'm done" button
Every lesson needs one button that lets a student finish. It's also a way out for a student who gets stuck.
- On Two colors, search the Widgets tab for
Submit Buttonand click it. - In Content, change Label to
I'm doneand set Submits to Lesson. - Set its Font Size to
18. In Style & Layout, set Background to a dark navy and Text to white, so it stands out on the pale background. Drag it to the bottom left, away from the number buttons.

Step 9: Play the lesson in Preview
Open the Opening Scene and click Preview. Press Look, and this time tap a wrong number, 4, after the cover comes down:
While the card is showing, the number buttons are greyed out, so a child looks first and answers after.

After a wrong answer, the card stays covered and the child can try again. Look again gives them one more look.

Tap Look again, then 5. The card comes back with its rings, and after three seconds the lesson moves on.
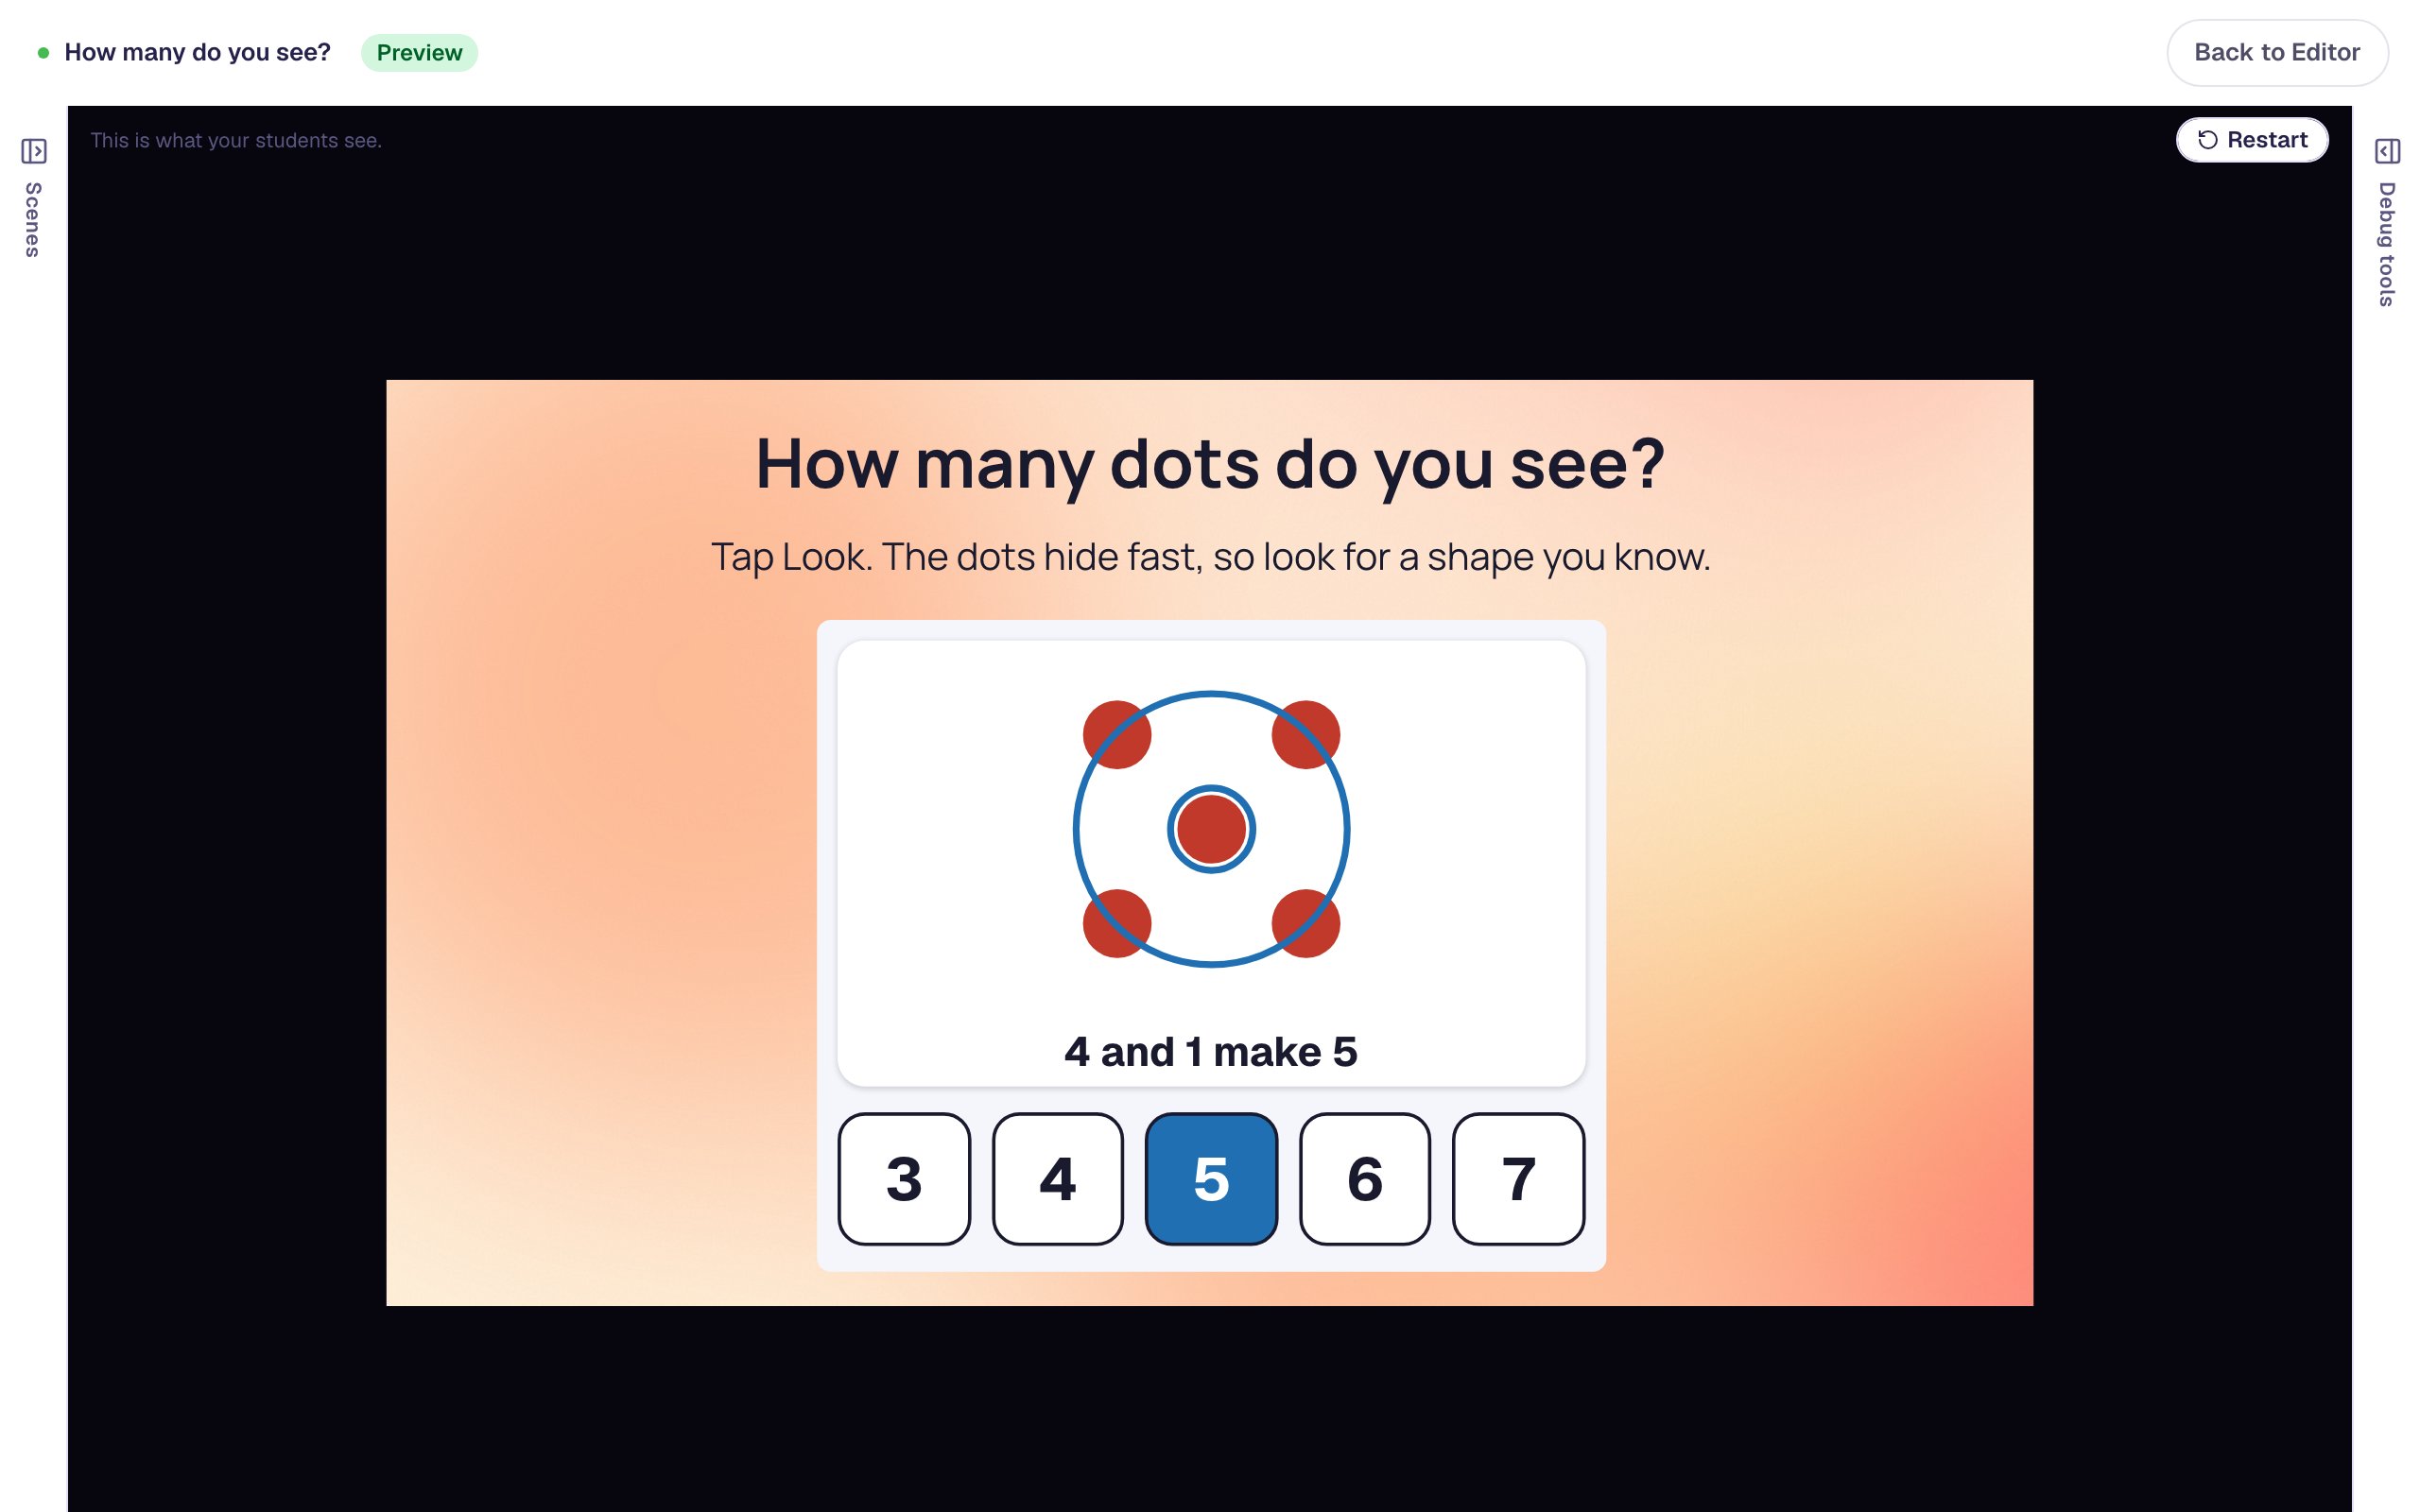
On Two colors, press Look and tap 7:


Using Look again, or taking a while to answer, never lowers the grade. A quick look is graded on the answer alone. On each student's attempt page you'll see how many looks they used and how long they took after the cover came down. A fast right answer after one look is what seeing without counting looks like.
What you built
You built a two-scene number-sense warm-up with:
- a Quick Look that flashes a dice-face 5 for two seconds, gives one more look, and rings 4 and 1 after a right answer,
- a copy of the scene, made with Copy to Scene, whose card shows 7 as Two colors: 4 red and 3 yellow,
- a longer Advance delay so students see the rings, and an I'm done button as a way out.
The routine runs best as a daily warm-up with a new card each time. Duplicate a scene and try the other arrangements: 10-frame shows 7 as 5 and 2 more, One missing shows 4 as a square with one spot gone, and Scattered has no pattern at all, so children group the dots themselves. For a student who needs more time, make a copy of the lesson with Stay on screen and assign it to them. To practise the next step, writing what they see as 4 + 3 = 7, follow Write an addition sentence for a ten frame.
Make this lesson yours
Add the lesson you just watched being built to your account, then change it for your class: your questions, your pictures, your colors.
Free to sign up, and you'll come straight back here. I have an account